This article is about my deployment experience of Gitea, a self-hosted GitHub like code hosting service which also support CI/CD pipeline workflows like GitHub Action.
Why I Need It
Recently, I was searching for a way to host Obsidian vault on the Internet. There is an official way to achieve this using Obsidian Publish, however, it’s not free.
So, I keep searching the Internet and finally saw this Reddit post discussing using SSG (static site generator) to host Obsidian vault, that’s exactly what I want. I randomly pick one in the comments section called Quartz, tried it out on my local computer, and seems that it works well with Obsidian.
Now the only thing I need to do is to have a self-host deployment tool like GitHub actions to automatically deploy my code every time I update my content. And my basic thought is shown by the image below:

Installation
Write at the beginning, it’s highly recommended to follow the official installation guide to finish your docker installation.
Gitea Installation
Installation Gitea using docker is quite straightforward, just follow its official guide. I choose to use docker compose method to create the container.
- Create a new unprivileged user
gitea(or any other name you want) - Create a new folder, here I use the
giteauser folder - Write your
docker-compose.ymlinside the folder - Run
docker compose up -d
In linux, we could create user using following command:
sudo adduser gitea
After create the user, we could go to its home directory /home/gitea and create a new docker-compose.yml file. Below is my own one for Gitea docker container. For more info, please read Official Gitea Docker Installation Guide on their website.
version: "3"

networks:
  gitea:
    external: false

services:
  server:
    image: docker.gitea.com/gitea:latest
    container_name: gitea
    environment:
      - USER=gitea
      - USER_UID=1005
      - USER_GID=1005
      - GITEA__database__DB_TYPE=postgres
      - GITEA__database__HOST=db:5432
      - GITEA__database__NAME=gitea
      - GITEA__database__USER=gitea
      - GITEA__database__PASSWD=gitea
    restart: always
    networks:
      - gitea
    volumes:
      - /sto/gitea:/data
      - /etc/timezone:/etc/timezone:ro
      - /etc/localtime:/etc/localtime:ro
    ports:
      - "30015:3000"
      - "30016:22"
    depends_on:
      - db

  db:
    image: docker.io/library/postgres:14
    restart: always
    environment:
      - POSTGRES_USER=gitea
      - POSTGRES_PASSWORD=gitea
      - POSTGRES_DB=gitea
    networks:
      - gitea
    volumes:
      - ./postgres:/var/lib/postgresql/data
Action Runner Installation
Finishing Gitea installation isn’t an end: The action feature doesn’t come with Gitea docker image installation. For the feature I depicted above to work, we also need to configure a runner to execute actions defined in our repository.
Still, Gitea have a well-documented official Gitea Act Runner guide for this procedure, please check it out.
Cache Action Support
One thing to notice in this guide is that if we want to use actions/cache in our workflow, then the procedures in “Advanced Configurations” is needed in order to make cache action work.

For demonstration, I will put on my own docker-compose.yml and config.yml for Act Runner:
services:
  runner:
    image: docker.io/gitea/act_runner:latest
    ports:
      - "30017:30017"
    environment:
      CONFIG_FILE: /config.yaml
      GITEA_INSTANCE_URL: "https://my-host.example.com"
      GITEA_RUNNER_REGISTRATION_TOKEN: "<my_reg_token>"
      GITEA_RUNNER_NAME: "example-runner"
      GITEA_RUNNER_LABELS: ""
    volumes:
      - ./config.yaml:/config.yaml
      - /var/run/docker.sock:/var/run/docker.sock
      - ./runner_output:/runner_output
    restart: always
cache:
  enabled: true
  dir: ""
  host: "<my_host_public_ipv4_addr>"
  port: 30017
Note that mapped port is the same, just like above we have mapping "30017:30017".
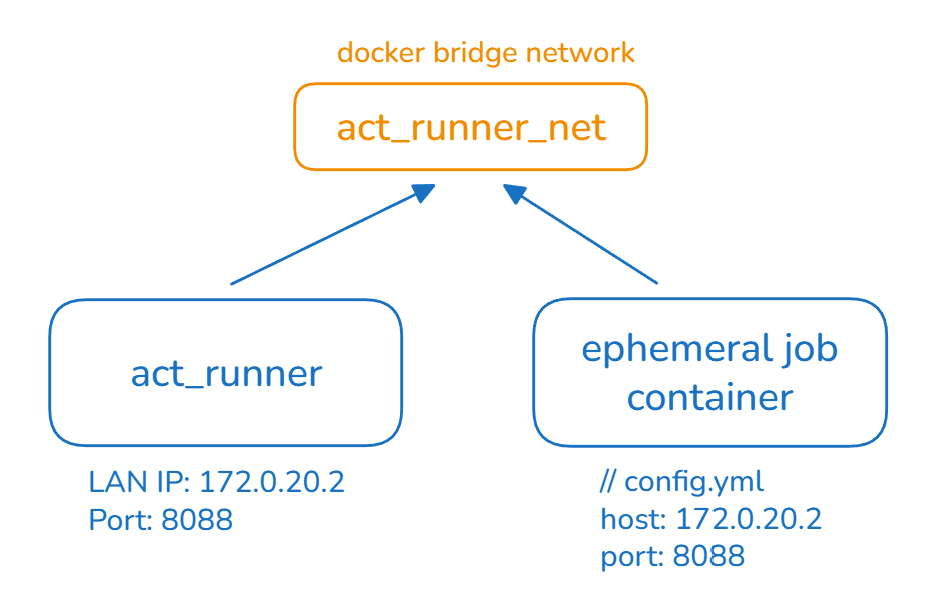
Also, if we configured act-runner and the temporary job runner to use the same docker bridge network (checkout Enable IPv6 chapter below), then we don’t even need to publish the port of act runner container. In this case, we first check the LAN IP address act-runner container is using, e.g. 172.0.20.1, then we use this IP as host and arbitrary port, e.g. 8088 then everything should work well.
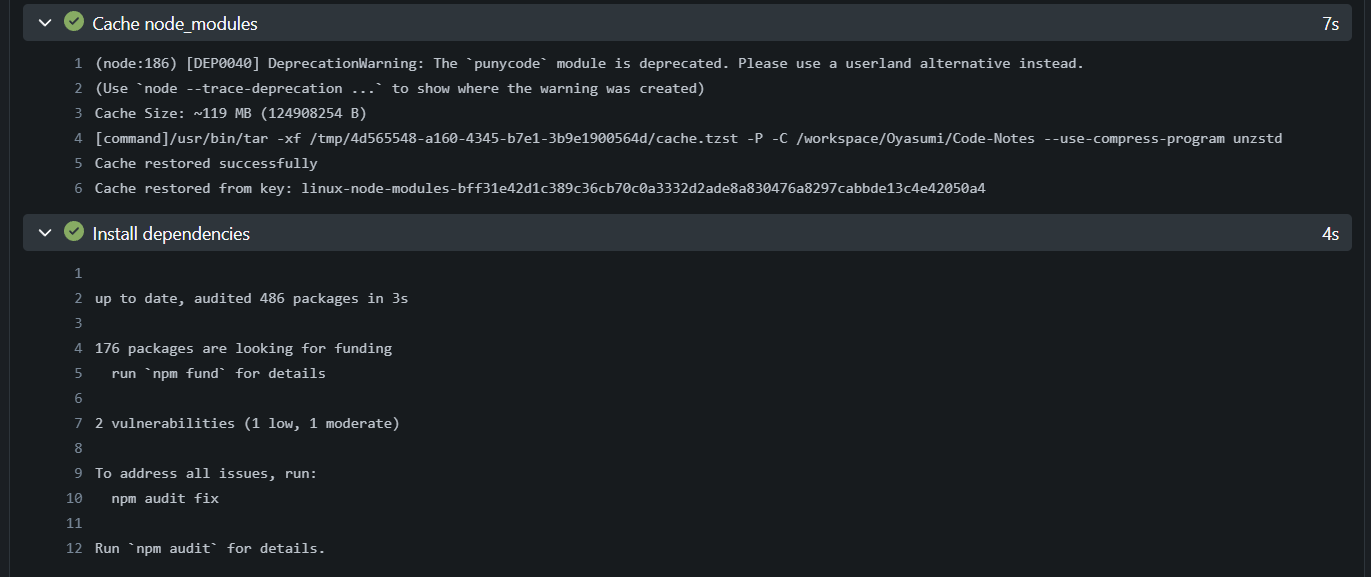
As shown below, cache should work once configured correctly:
Note that we should NOT set GITEA_RUNNER_EPHEMERAL=1 environmental variable, otherwise the container will stop immediately after finishing any distributed action task.
Enable IPv6 For Action Runner
The default bridge network does NOT enable IPv6, so we need to manually enable it in our docker-compose.yml file:
// previous configuration
networks:
  act_runner:
    name: act_runner_net
    driver: bridge
    enable_ipv6: true
The full Action Runner docker compose file looks like the one below:
services:
  runner:
    container_name: gitea-act-runner
    image: docker.io/gitea/act_runner:latest
    ports:
      - "30017:30017"
    environment:
      CONFIG_FILE: /config.yaml
      GITEA_INSTANCE_URL: "https://gitea.example.com/"
      GITEA_RUNNER_REGISTRATION_TOKEN: "TOKEN_SECRET"
      GITEA_RUNNER_NAME: "gc-4t"
      GITEA_RUNNER_LABELS: ""
    volumes:
      - ./config.yaml:/config.yaml
      - /var/run/docker.sock:/var/run/docker.sock
      - ./runner_output:/runner_output
    restart: always
    networks:
      - act_runner

networks:
  act_runner:
    name: act_runner_net
    driver: bridge
    enable_ipv6: true
However, this is not enough, since every time an action task has been distributed to the runner, the runner will create a temporary docker container. We need to use config.yml to ensure such temporary container also use this network.
We could write config.yml like below:
cache:
enabled: true
dir: ""
host: "IP_ADDR"
port: YOUR_PORT
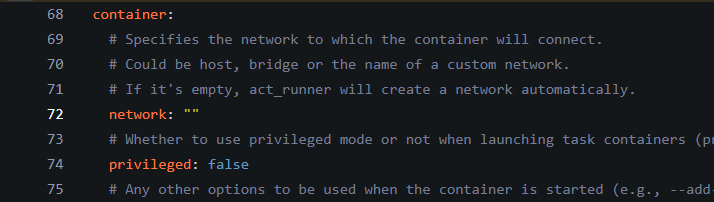
container:
network: "act_runner_net"
This will ensure every newly created temporary container use act_runner_net as its network. About details of Act Runner config file, checkout example config file.
For more info about IPv6 network question, checkout this community question.
For info above docker network, checkout official docs of Networking and Bridge network.
Maintenance
About Act Runner Cache
If we do not customize the cache storage path for Act Runner, the cache files will actually store in the main act runner docker container’s root user path:
/root/.cache/act
/root/.cache/actcache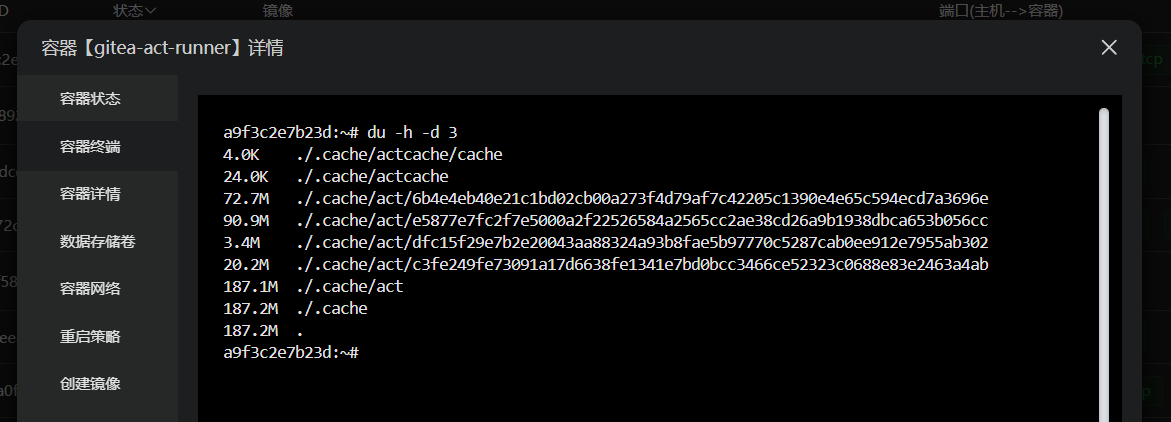
Since the cache could be accumulated to a large size in the future, it’s better to know where it is and manually clean it if needed.
Enjoy Self-Hosted Actions
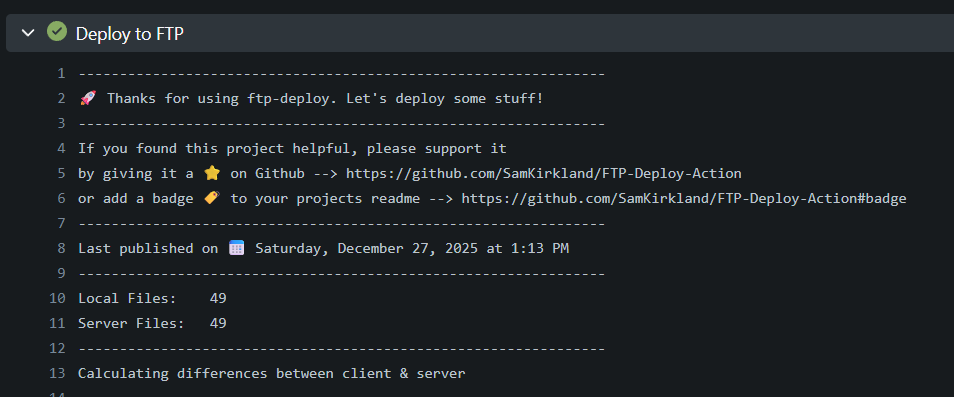
After all the steps above, the Gitea should now run on the host. And it should be able to execute actions defined in the .github/workflows directory of your project:

As shown above, I used this self-host Gitea to auto-build my Leetcode note website codenotes.nfblogs.com, every time I push to this remote repo, Gitea will automatically run npx quartz build to generate public folder and then use FTP to deploy to target directory on my web server.

Use LFS With actions/checkout
Currently, the action/checkout doesn’t work well with Git LFS storage, and will fail to fetch LFS files when using lfs:true, as shown in the image below.
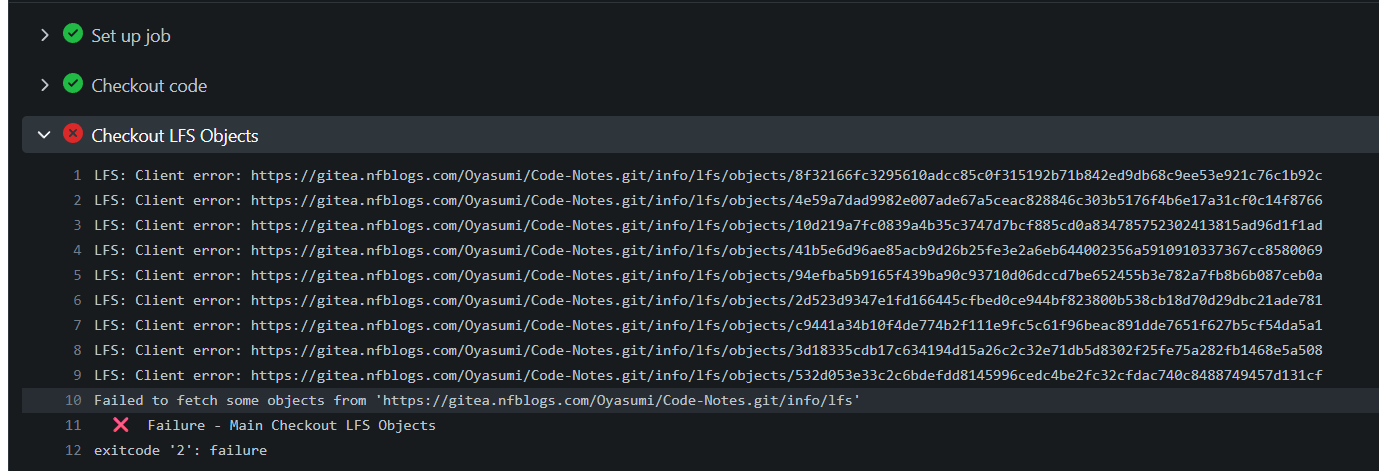
Such bugs are detailed discussed in this GitHub Issue page. Luckily, there is a workaround for actions/checkout@v6 shown in the discussion:
git lfs install --local
AUTH=$(git config http.${{ gitea.server_url }}/.extraheader)
AUTH_FILE=$(git config includeif.gitdir:/workspace/${{ gitea.repository }}/.git.path)
git config -f $AUTH_FILE --unset http.${{ gitea.server_url }}/.extraheader
git config -f $AUTH_FILE http.${{ gitea.server_url }}/${{ gitea.repository }}.git/info/lfs/objects/batch.extraheader "$AUTH"
git lfs pull
Instead of using lfs:true with checkout action, we could directly use the commands shown above as the step to checkout LFS storage.
# something else

jobs:
  build-and-deploy:
    # ...
    steps:
      - name: Checkout code
        uses: actions/checkout@v6
        with:
          fetch-depth: 1
          # lfs: true  # THIS DOESN'T WORK!!!!!!!!!

      - name: Set up Git LFS
        run: |
          git lfs install --local
          AUTH=$(git config http.${{ github.server_url }}/.extraheader)
          AUTH_FILE=$(git config includeif.gitdir:/workspace/${{ github.repository }}/.git.path)
          git config -f $AUTH_FILE --unset http.${{ github.server_url }}/.extraheader
          git config -f $AUTH_FILE http.${{ github.server_url }}/${{ github.repository }}.git/info/lfs/objects/batch.extraheader "$AUTH"
          git lfs pull
Things That Do Not Resolved
Better Deployment Method
For me, since these are for personal use only, the Act Runner, Web Server and Gitea Server are actually running at the same remote server. So, using FTP to connect from Act Runner Docker to my host seems a little bit wired and unnecessary. Maybe I should find a better way to deploy the artifact public folder after action successfully generate it using npm quartz build.
This part serves as a reminder to myself, maybe I will go back to check and fix these things in the future.
Fixed IPv6 issue today and update the article 🙂